
Time & billing
Writing time (stopwatch, quick entry, manual), write-offs, and from billing queue to sent invoice.
Nederlandse versie: /handleiding/tijd-en-facturatie
What is this? Time you spend on a case is recorded against the matter — even when the case isn’t billed hourly (for example a fixed fee or legal aid). That way it’s always visible how much work went into a matter. Invoicing happens per matter, from the recorded hours. The interface is in Dutch; on-screen names are quoted below.
Three ways to write time
All three end up in the same hours administration of the matter:
1. With the stopwatch (while you work)
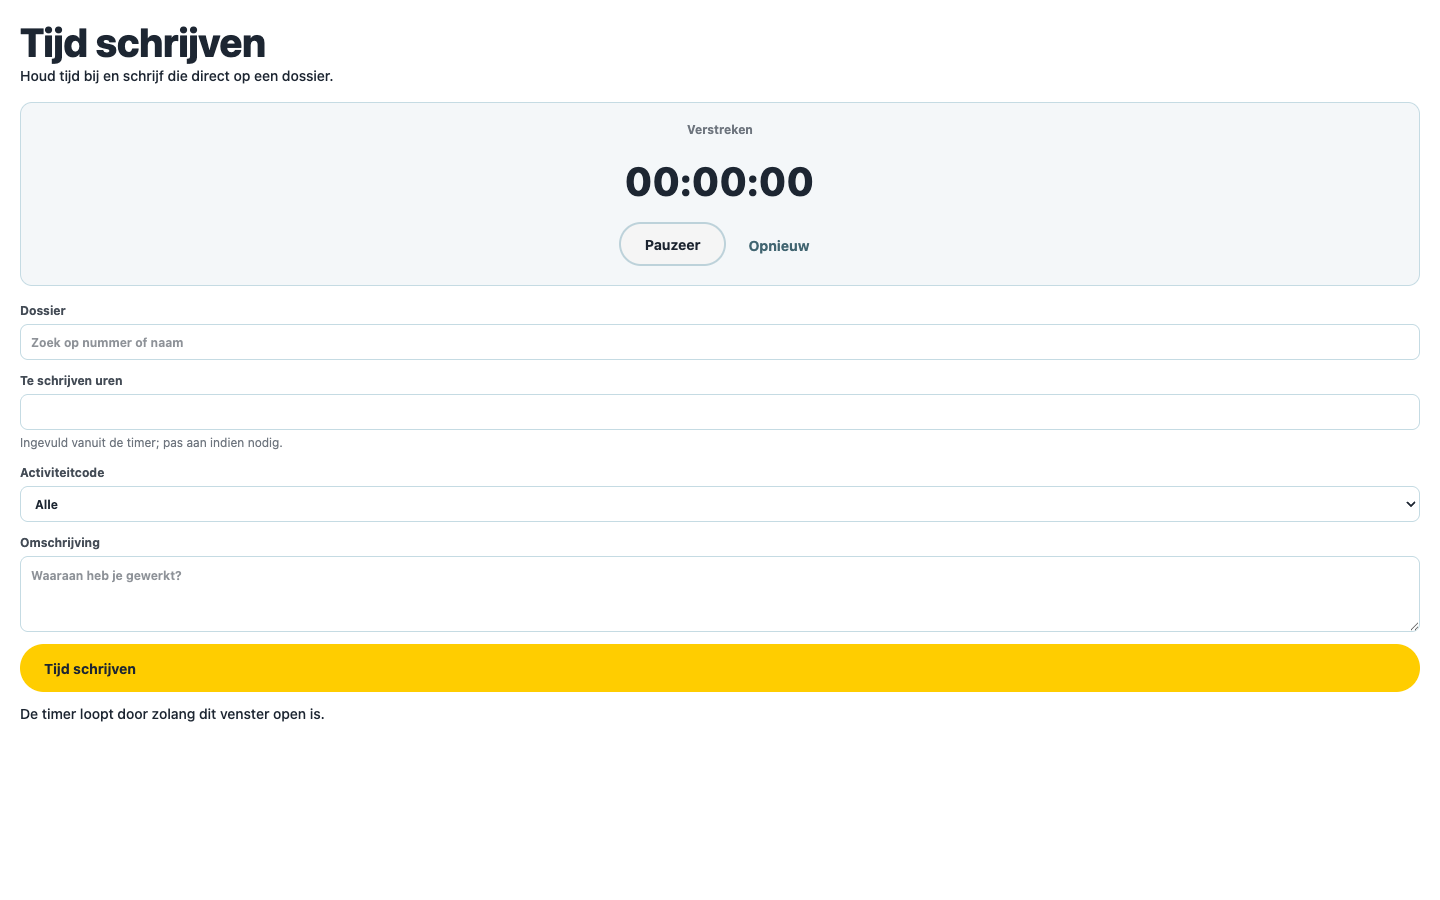
- Click “Tijd schrijven” (write time) in the top bar. The stopwatch window opens.
- Click “Start” when you begin; “Pauzeer” (pause) and “Hervat” (resume) work in between. The timer keeps running as long as the window is open.
- Done? Search the “Dossier” (matter) (search by number or name), pick an “Activiteitcode” (activity code), fill in the “Omschrijving” (description — “Waaraan heb je gewerkt?”, what did you work on?). The “Te schrijven uren” (hours to write) field is pre-filled from the timer — adjust if needed.
- Click “Tijd schrijven”.
2. With quick entry (one typed line)
See it in action:
- Click “Uren” (hours) in the left rail. At the top sits the “Snelinvoer” (quick entry) field.
- Type one line in the format
<matter> <duration> [activity] <description>, for example:2024.001 1u30 advies Telefonisch overleg cliënt. Accepted duration formats include1u30,1:30,0,5,30m, or90. - Check the “Voorbeeld” (preview — Dossier, Duur, Activiteit, Omschrijving) and click “Toevoegen” (add).
3. Manually or afterwards
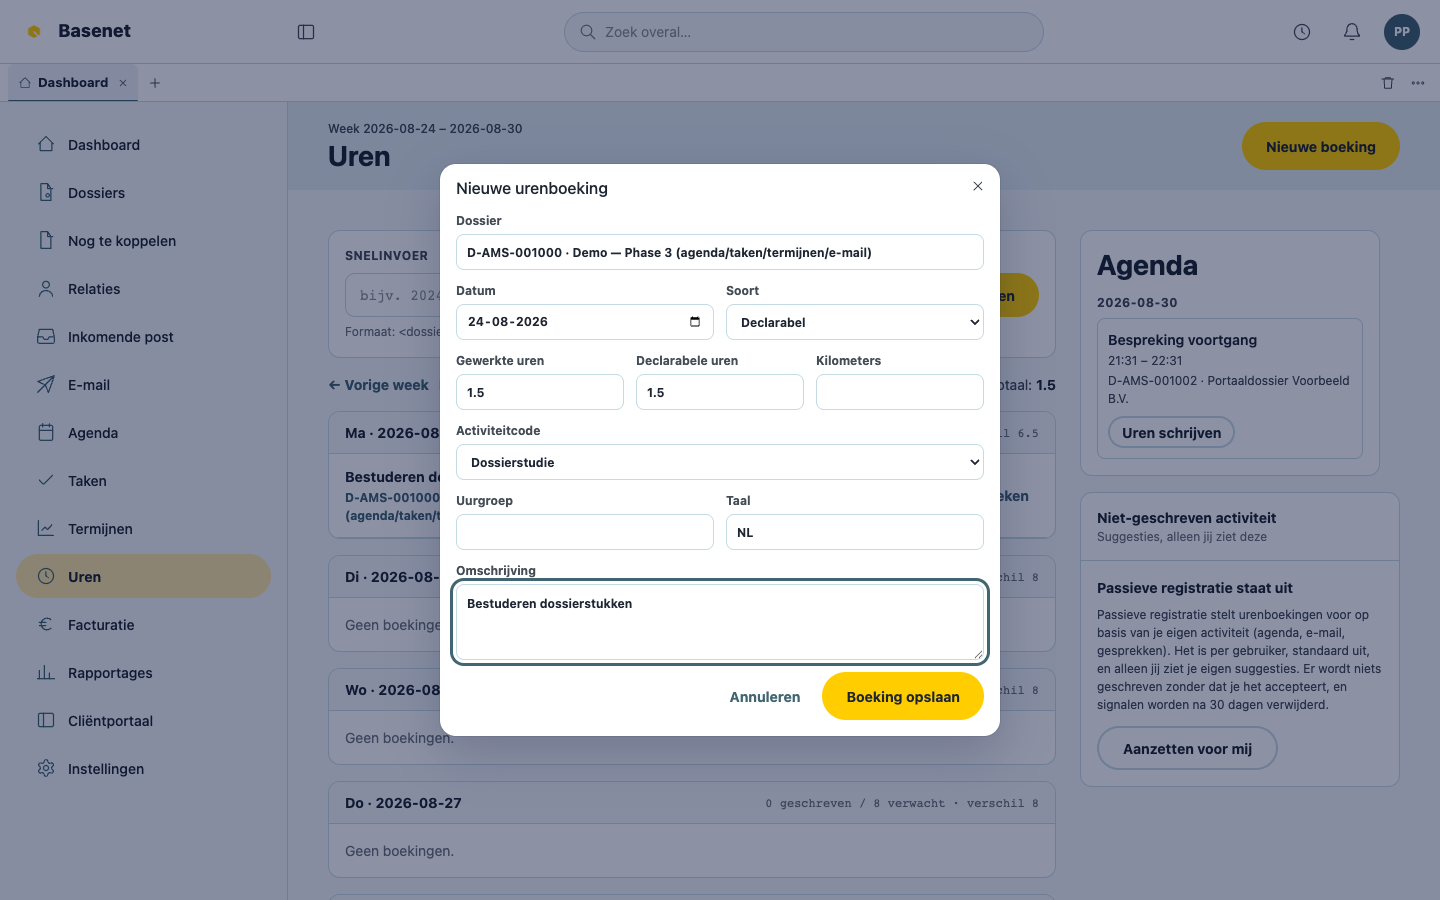
- Click “Uren”, then “Nieuwe boeking” (new entry).
- Search the “Dossier”, fill in “Datum” (date), “Gewerkte uren” (hours worked), “Declarabele uren” (billable hours), “Soort” (class — Declarabel, Intern, or Niet-declarabel), “Activiteitcode”, and “Omschrijving”.
- Click “Boeking opslaan” (save entry).
The hours page shows your week with a “Weektotaal” (week total), and per week “geschreven” (written), “verwacht” (expected), and “verschil” (difference) — the same picture as the dashboard widget “Mijn uren deze week”.
Suggestions from your own activity (optional)
Under “Niet-geschreven activiteit” (unwritten activity), Basenet can propose time entries based on your own calendar, email, and documents. This is off by default per user; turn it on with “Aanzetten voor mij” (turn on for me). Only you see your suggestions, and nothing is written unless you click “Accepteren” (accept) (“Negeren”, ignore, is always available).
How to write off hours
To bill less than was worked (goodwill, training):
- Click “Afboeken” (write off) on the time entry.
- Fill in the “Nieuw declarabel” (new billable) number of hours and a “Reden” (reason — required).
- Click “Afboeking toepassen” (apply write-off). The original hours worked stay recorded for realization reporting.
Hours on an invoice are locked and show the label “Gefactureerd” (invoiced).
How to create an invoice
-
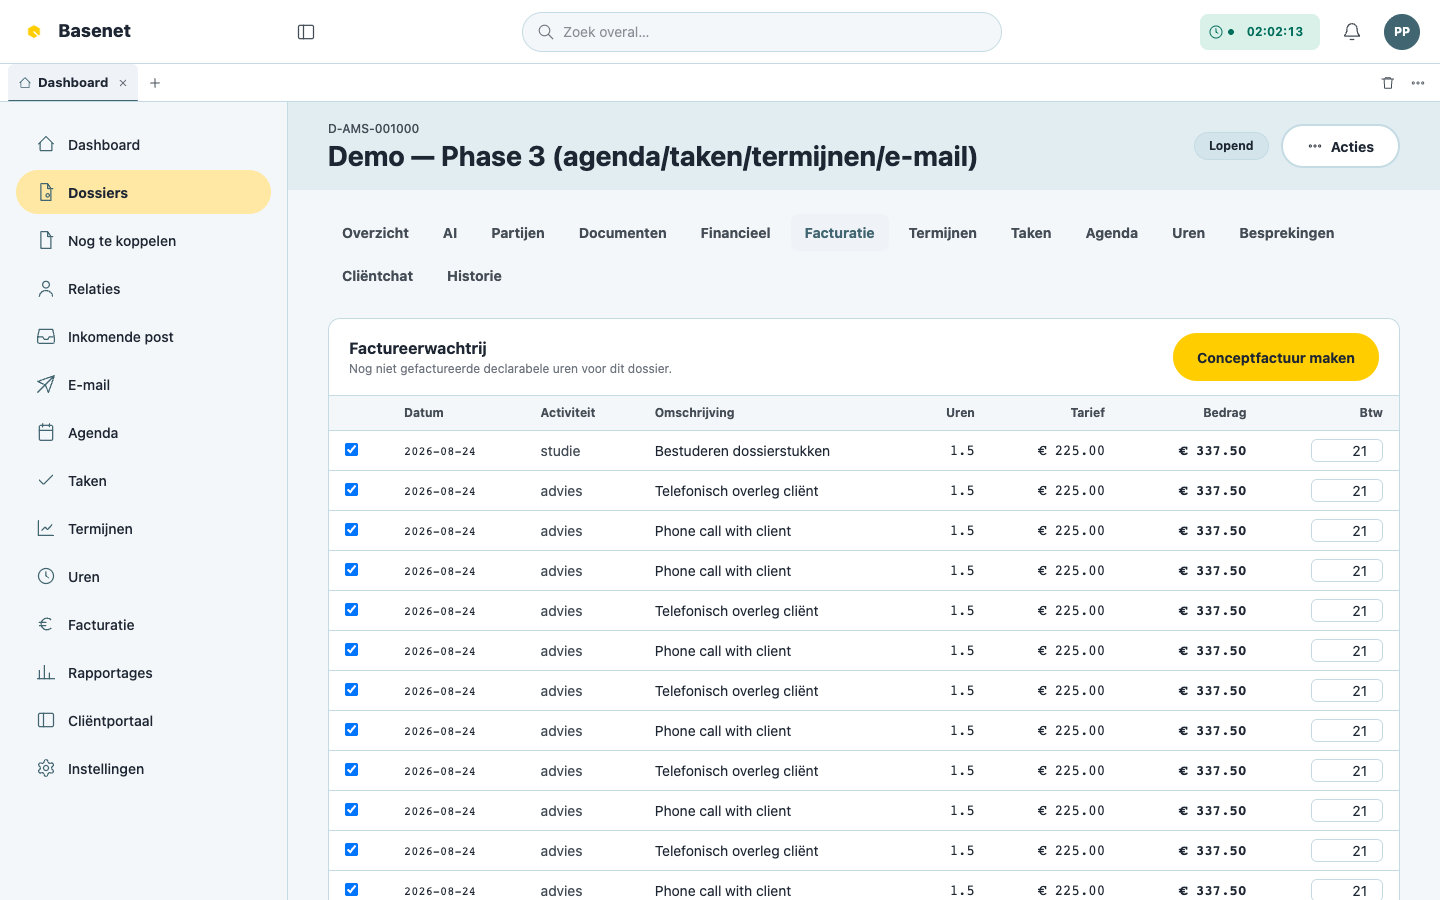
Open the matter and click the “Facturatie” tab.
-
The “Factureerwachtrij” (billing queue) lists the not-yet-invoiced billable hours, with “Uren”, “Tarief” (rate), and “Bedrag” (amount). Select the lines you want to invoice.
-
Click “Conceptfactuur maken” (create draft invoice).
-
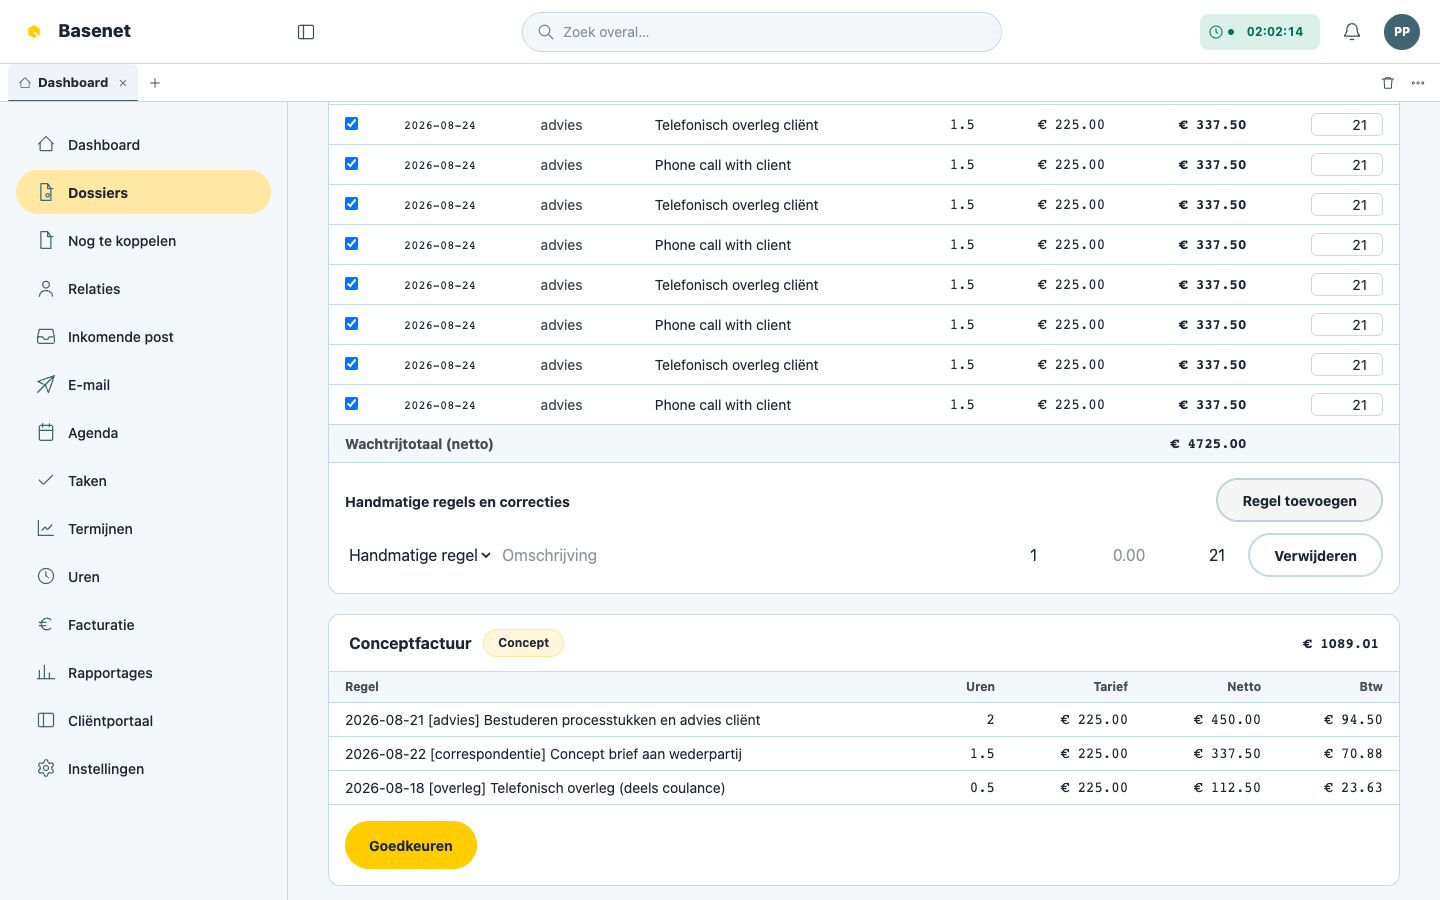
Review the draft invoice (“Netto”, “Btw”, “Bruto”). You can:
- add a manual line or “Correctie” (correction) under “Handmatige regels en correcties” with “Regel toevoegen” (add line) (Aantal, Bedrag in euro);
- for a fixed-fee arrangement, tick “Resterende vaste prijs opnemen” (include remaining fixed fee).
-
Click “Goedkeuren” (approve). The invoice gets a final “Factuurnummer” (invoice number).
-
Under “Verzenden” (send) pick the “Kanaal” (channel) — “PDF”, “UBL”, “Peppol”, or “LEDES” — and click “Factuur verzenden” (send invoice). The “Peppol-status” appears on the invoice afterwards.
-
Afterwards you can create a payment link (“Betaallink maken”) for the client and forward the invoice to the connected accounting system with “Naar boekhouding boeken” (post to accounting).
The firm-wide invoice list lives under “Facturatie” in the left rail, showing per invoice the “Status” (Concept, Goedgekeurd, Verzonden, Betaald, Gecrediteerd) and the payment status.
Fixed fees, legal aid, and other arrangements
The matter’s “Financieel” tab holds the “Financiële afspraak” (financial agreement): “Standaardtarief (€/u)” (standard rate), “Vaste prijs (€)” (fixed fee), “Voorschot (€)” (advance), rate exceptions per employee, “Factuursplitsingen” (invoice splits — multiple payers), and “Gefinancierde rechtsbijstand (toevoeging)” (legal aid) with the “Eigen bijdrage (€)” (client’s own contribution). For a legal-aid matter that doesn’t continue as an hourly case, Basenet blocks hourly invoicing.
What does Peppol mean?
Peppol is a secure, Europe-wide delivery channel for electronic invoices: the invoice arrives directly and accurately in the recipient’s accounting system instead of as a loose PDF attached to an email. See also the Glossary.