
Getting started: office setup
From empty environment to your first matter, time entry, and draft invoice — step by step.
Nederlandse versie: /handleiding/snelstart
What is this? This page is for the firm that’s just getting started with Basenet. You’ll go in one continuous pass from setup to your first matter, your first time entry, and your first draft invoice. Steps only an administrator can complete are marked (administrator only).
Step 1 — Follow the setup guide (administrator only)
Basenet has a built-in guide that shows what’s already configured and points you to the right screen.
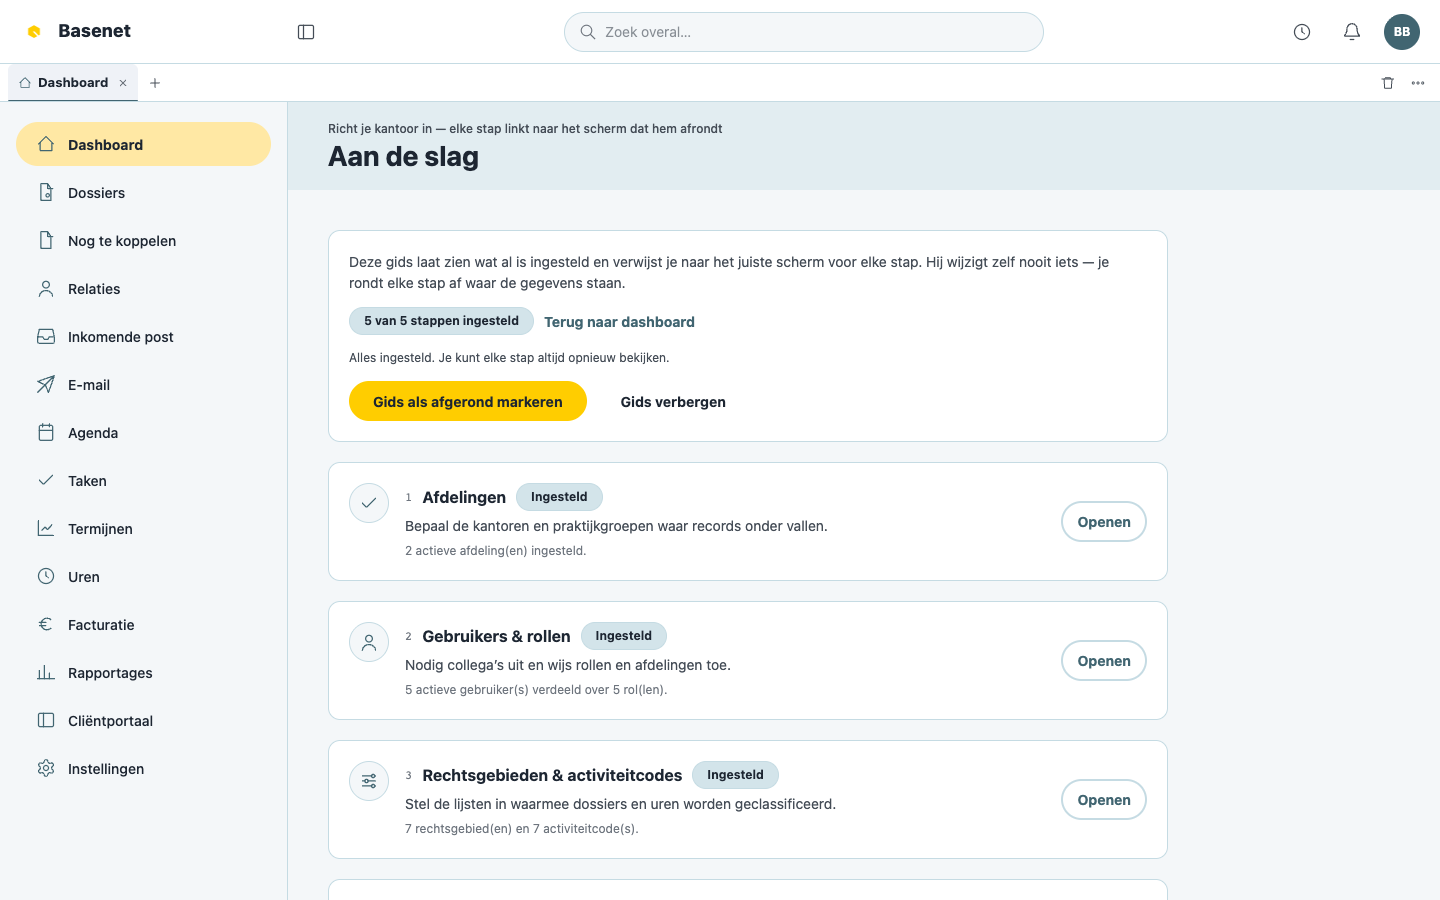
- Log in. Your “Dashboard” shows the card “Richt je kantoor in” (set up your office).
- Click “Aan de slag” (get started). You land on the “Aan de slag” page with six steps. Each step shows the status “Ingesteld” (configured), “Te doen” (to do), or “Optioneel” (optional), with an “Openen” (open) button to the screen where you complete it:
- “Afdelingen” (departments) — the offices and practice groups records fall under.
- “Gebruikers & rollen” (users & roles) — invite colleagues and assign roles and departments.
- “Rechtsgebieden & activiteitcodes” (practice areas & activity codes) — the lists used to classify matters and hours.
- “Financiële standaarden” (financial defaults) — default rates and billing defaults for new matters.
- “Koppelingen” (connectors) (optional) — Microsoft 365, accounting, payments, and other systems.
- “Je eerste dossier” (your first matter) — you’ll create this below.
- The guide never changes anything itself: you complete each step on the screen where the data actually lives. Done? Choose “Gids als afgerond markeren” (mark guide as complete) (or “Gids verbergen”, hide guide).
Step 2 — Prepare the client details
A matter always hangs off a client. Clients are recorded as a relation, but you do not need to create that relation in advance for your first matter: the matter wizard can do it inline.
- First check whether the client already exists under Relations; you can select that relation in the wizard.
- For a new client, collect the name and contact details. For a company, a KvK number helps with the lookup and compliance check.
- The wizard supports companies, individuals, and contacts. When applicable, a new company goes through the KvK/CreditDevice lookup, compliance check, and Wwft acceptance before you continue.
Step 3 — Create your first matter
- Click Matters in the left rail, then New matter. The wizard opens on its own page and saves your draft for this browser session, so a reload resumes it.
- Under The matter, enter at least the matter name, matter type, and practice area, then click Next.
- Under The client, select an existing relation or create the client inline. You do not leave the wizard.
- For the fast route, go directly to Review and create. You can skip Other parties and Team and financials. Otherwise, use those optional steps to record party roles, solicitors, and a financial agreement with its rate or amount and invoice recipient.
- If the Conflict of interest check finds a match, review it, acknowledge that you want to continue, and enter the required reason. Basenet records this acknowledgement.
- Review the summary and click Create matter. New relations, the matter, parties, and financial agreement are only saved together at this point; if anything fails, none of that creation is retained.
You now land on the matter overview — the central place where everything about this case comes together. See Matters for all the tabs.
Step 4 — Write your first hours
- Click “Uren” (hours) in the left rail. You see the week view.
- Click “Nieuwe boeking” (new entry).
- Search for the matter, then fill in date (“Datum”), hours worked (“Gewerkte uren”), activity code (“Activiteitcode”), and description (“Omschrijving”).
- Click “Boeking opslaan” (save entry).
There’s a faster way too: the “Snelinvoer” (quick entry) field at the top of the hours page accepts one line such as 2024.001 1u30 advies Telefonisch overleg cliënt, and the “Tijd schrijven” (write time) button in the top bar opens a stopwatch that runs while you work. See Time & billing.
Step 5 — Create your first draft invoice (only for those with billing rights)
-
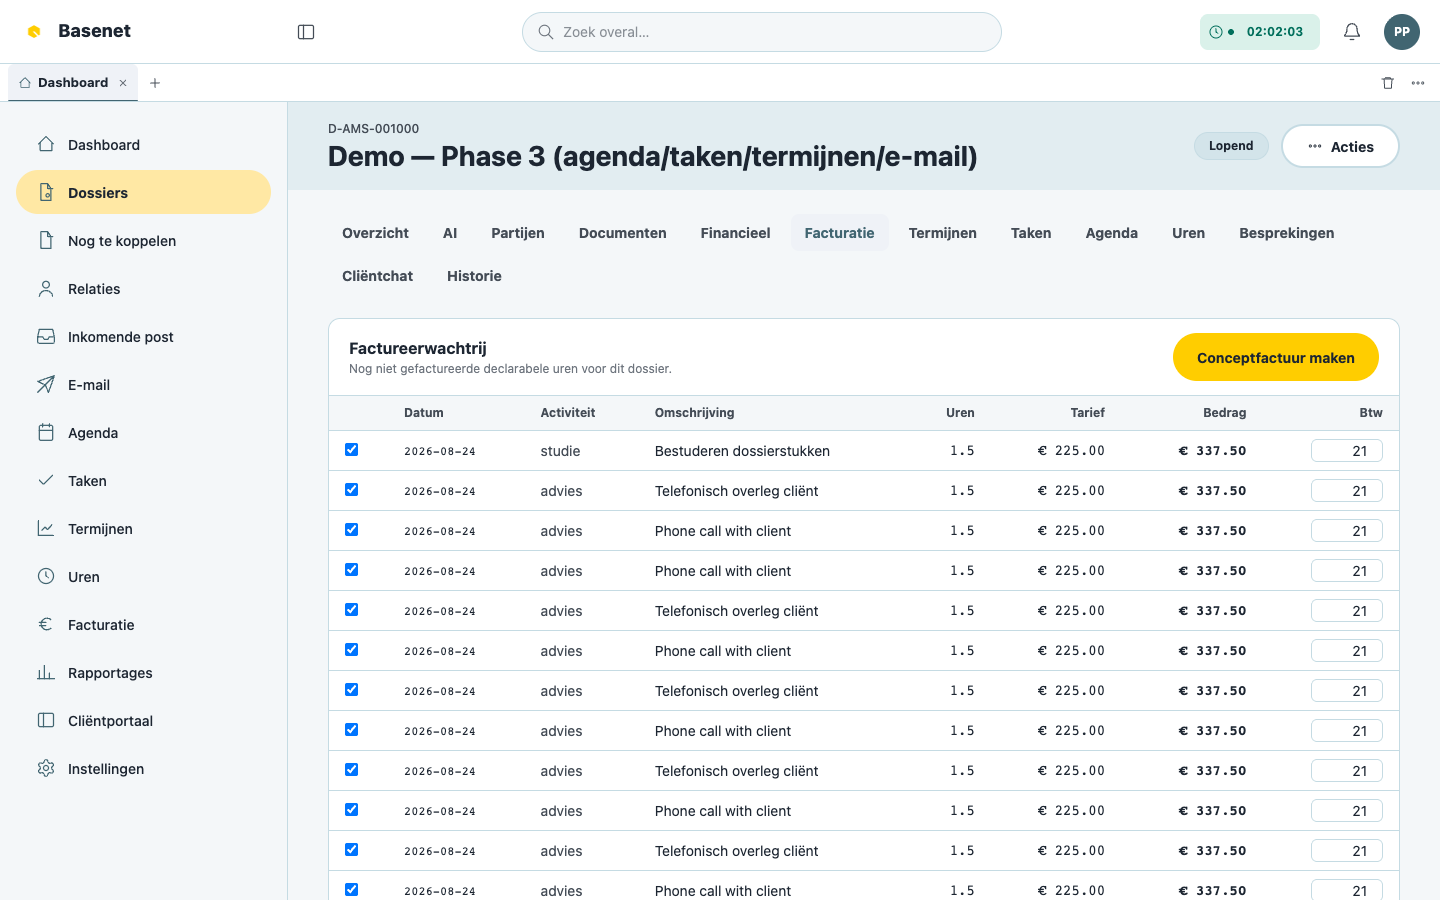
Open the matter and click the “Facturatie” (billing) tab.
-
The “Factureerwachtrij” (billing queue) lists the not-yet-invoiced billable hours. Select the time entries you want to invoice.
-
Click “Conceptfactuur maken” (create draft invoice).
-
Review the draft (net “Netto”, VAT “Btw”, gross “Bruto”). If needed, add a line under “Handmatige regels en correcties” (manual lines and adjustments) with “Regel toevoegen” (add line) — for example for a fixed fee.
-
Click “Goedkeuren” (approve). The invoice gets an invoice number (“Factuurnummer”), and afterwards you send it under “Verzenden” (send) via channel “PDF”, “UBL”, “Peppol”, or “LEDES”.
Done — now what?
- Invite the rest of the firm via “Instellingen → Gebruikers” (settings → users) (administrator only).
- Connect Microsoft 365 for email and documents via “Instellingen → Koppelingen” (settings → connectors) (administrator only) — see Settings.
- Give your client access to the client portal — see Client onboarding.